
")


")
We have a server that serves the home net, why not add him hosting.Pervoe that we will begin to do this - try to set up bridges for hosting a server through our network providers should give web content, and for each user it is necessary to ensure that hosting opportunity to work on independent virtual server, immediately begs the perimeter network (DMZ), which we will do through the bridge br-dmz, still need a bridge to the network card provider br-int, and everything else the server must serve the local network.So
Our network:
eth0 - network to the provider . eth1 - local network.
We will do the bridge:
br-int without IP on eth0, br-loc IP static IP on eth1, br-dmz bridge to the demilitarized zone (virtual server hosting users).
Set the required for this package.
yum install bridge-utils tunctl -y
If your system with a graphical interface, you must disable NetworkManager
- chkconfig NetworkManager off
- chkconfig network on
- service NetworkManager stop
- service network start
It is assumed that your network running and configured now and the right to establish a bridge network.
nano /etc/sysconfig/network-scripts/ifcfg-br-int
DEVICE=br-int
TYPE=Bridge
ONBOOT=yes
NM_CONTROLLED=no
BOOTPROTO=none
DEFROUTE=yes
IPV4_FAILURE_FATAL=yes
IPV6INIT=no
NAME="System br-int"
nano /etc/sysconfig/network-scripts/ifcfg-eth0
reducible to the form
DEVICE=eth0
TYPE=Ethernet
ONBOOT=yes
NM_CONTROLLED=no
BOOTPROTO=none
HWADDR=XX:XX:XX:XX:XX:XX # MAC address network
NAME="System eth0"
BRIDGE=br-int
IPV6INIT=no
Also with the second network itself
nano /etc/sysconfig/network-scripts/ifcfg-br-loc
DEVICE=br-loc
TYPE=Bridge
ONBOOT=yes
NM_CONTROLLED=no
BOOTPROTO=none
IPADDR=ххх.ххх.ххх.ххх # IP Bridge
PREFIX=24
GATEWAY=ххх.ххх.ххх.ххх # put your
DNS1=ххх.ххх.ххх.ххх # put your
DOMAIN=название вашего домена
DEFROUTE=yes
IPV4_FAILURE_FATAL=yes
IPV6INIT=no
NAME="System br-loc"
nano /etc/sysconfig/network-scripts/ifcfg-eth1
reducible to the form
DEVICE=eth1
TYPE=Ethernet
ONBOOT=yes
NM_CONTROLLED=no
BOOTPROTO=none
HWADDR=XX:XX:XX:XX:XX:XX # MAC address network
NAME="System eth1"
BRIDGE=br-loc
And for the DMZ zone
nano /etc/sysconfig/network-scripts/ifcfg-br-dmz
EVICE=br-dmz
TYPE=Bridge
ONBOOT=yes
NM_CONTROLLED=no
BOOTPROTO=none
NAME="System br-dmz"
Restart Network
service network restart
On the host iptables give to this kind of
nano /etc/sysconfig/iptables
*filter
:INPUT ACCEPT [0:0]
:FORWARD ACCEPT [0:0]
:OUTPUT ACCEPT [0:0]
-A INPUT -m state --state ESTABLISHED,RELATED -j ACCEPT
-A INPUT -p icmp -j ACCEPT
-A INPUT -i lo -j ACCEPT
-A INPUT -m state --state NEW -m tcp -p tcp --dport 22 -j ACCEPT
-I INPUT -p tcp --dport 3389 -m state --state NEW -j ACCEPT #- It is only in the event that set KDE or GNOME and doing remote access via RDP
-A INPUT -j REJECT --reject-with icmp-host-prohibited
-A FORWARD -j REJECT --reject-with icmp-host-prohibited
COMMIT
Restart iptables
service iptables restart
Let's see what we got to the bridges
brctl show
You should see something like
bridge name bridge id STP enabled interfaces
br-dmz 8000.000000000000 no
br-int 8000.d027880416d7 no eth0
br-loc 8000.6805ca06ecd9 no eth1
The configuration of the server hosting our home looks like this:
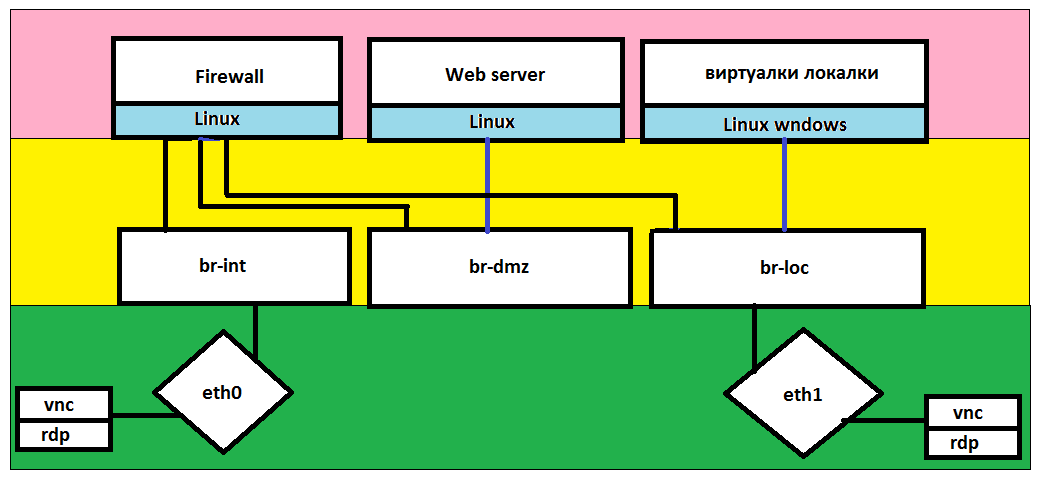
By color:
Green - server level.
Yellow - the hypervisor level
Pink - the level of virtual machines.
The concept of the server next, Dev Firewall (Router) - by name, all traffic will steer through it, it will also be proxying Nginx for razrulivaniya web content hosting users on a Web server, a Web server on a separate network (DMZ), and the local part of that to the house, too, it was wonderful.
Now you can put KVM look here (omitting the adjustment bridge, as we have already set up), you can also put the GUI GNOME or KDE configuration virtualke going through the "Virtual Machine Manager".
Let's go put Router (Firewall), and deliver it with all our bridges br-int, br-dmz, br-loc, he will be running CentOs currently version 6.7. After installation, we get 3 network eth0, eth1, eth2 through which we let all traffic.
Edit the file network /etc/sysconfig/network-scripts/
|
ifcfg-eth0 DEVICE=eth0 |
ifcfg-eth1 DEVICE=eth1 |
ifcfg-eth2 DEVICE=eth2 |
Explanation:
eth0 (ifcfg-eth0) - set up for an IP via DHCP from the ISP, it will come to all traffic from the Internet.
eth1 (ifcfg-eth1) - it is our DMZ her own network (static IP) does not intersect with the local (users do not need to climb into our hosting lokalku).
eth2 (ifcfg-eth2) - This is your local, too, give it a static IP network.
On the router (Firewall) give to this kind of iptables
nano /etc/sysconfig/iptables
*filter
:INPUT ACCEPT [0:0]
:FORWARD ACCEPT [0:0]
:OUTPUT ACCEPT [0:0]
-A INPUT -m state --state ESTABLISHED,RELATED -j ACCEPT
-A INPUT -p icmp -j ACCEPT
-A INPUT -i lo -j ACCEPT
-A INPUT -m state --state NEW -m tcp -p tcp --dport 22 -j ACCEPT # This SSH
-A INPUT -m state --state NEW -m tcp -p tcp --dport 80 -j ACCEPT # then nginx will respond that we will deliver later
-A INPUT -s the local network -j ACCEPT # then allow LAN shy
-A INPUT -s ДМЗ -j ACCEPT # then the DMZ
-A INPUT -j REJECT --reject-with icmp-host-prohibited
-P FORWARD DROP
-A FORWARD -i lo -o lo -j ACCEPT
-A FORWARD -i eth2 -o eth0 -j ACCEPT # allowed to pass the local package
-A FORWARD -i eth1 -o eth0 -j ACCEPT # DMZ is allowed to pass packets (typically do not include considerations of. security)
-A FORWARD -m state --state RELATED,ESTABLISHED -j ACCEPT
COMMIT
*nat
:PREROUTING ACCEPT [0:0]
:POSTROUTING ACCEPT [0:0]
:OUTPUT ACCEPT [0:0]
-A POSTROUTING -o eth0 -j MASQUERADE # allowed to go online
COMMIT
Restart iptables
service iptables restart
Now put on Router (Firewall) Nginx, as described here.
Theoretically, with the router (Firewall) we ended up later for the home grid can I tell you how to traverse into the multicast network to watch TV channels, you can proceed to configure the Web servaka.
The web server is set as well as for the router, CentOs 6.7, just give him a bridge br-dmz. After installation, we will be at the disposal of the network eth0, I think it will be easier to set a static IP (remember that the grid DMZ) as the router it will be easier to steer trafikom.Skript:
nano /etc/sysconfig/network-scripts/ifcfg-eth0 It will look like this:
DEVICE=eth0
TYPE=Ethernet
ONBOOT=yes
NM_CONTROLLED=yes
BOOTPROTO=none
HWADDR=Your E network
IPADDR= your IP
PREFIX=8
GATEWAY=here in the gateway IP router is eth1
DNS1=then it will be a DNS DNS that we may put on the router later
DEFROUTE=yes
IPV4_FAILURE_FATAL=yes
IPV6INIT=no
NAME="System eth0"
Crtl+O , Ctrl+X
On the Web a server (Web Server) give to this kind of iptables
nano /etc/sysconfig/iptables
*filter
:INPUT ACCEPT [0:0]
:FORWARD ACCEPT [0:0]
:OUTPUT ACCEPT [0:0]
-A INPUT -m state --state ESTABLISHED,RELATED -j ACCEPT
-A INPUT -p icmp -j ACCEPT
-A INPUT -i lo -j ACCEPT
-A INPUT -m state --state NEW -m tcp -p tcp --dport 22 -j ACCEPT #Sunset over SSH
-A INPUT -m state --state NEW -m tcp -p tcp --dport 80 -j ACCEPT #then Apache will respond
-A INPUT -j REJECT --reject-with icmp-host-prohibited
-A FORWARD -j REJECT --reject-with icmp-host-prohibited
COMMIT
Crtl+O , Ctrl+X
Still it is necessary to disable SELinux.
Perform the command (If the study broke SELinux, repeat this on all Dev):
nano /etc/selinux/config
And replace the value of the variable in the SELINUX = disabled, should happen
# This file controls the state of SELinux on the system.
# SELINUX= can take one of these three values:
# enforcing - SELinux security policy is enforced.
# permissive - SELinux prints warnings instead of enforcing.
# disabled - No SELinux policy is loaded.
SELINUX=disabled
# SELINUXTYPE= can take one of these two values:
# targeted - Targeted processes are protected,
# mls - Multi Level Security protection.
SELINUXTYPE=targeted
Hit Ctrl O and Ctrl X, in principle, not bad to Reload (to restart the computer).
Ready to install the rest of the meat, then ka Apache, PHP 5.4, MySQL! ! there is a suspicion that perhaps it is better to make a separate Dev.
Installing php 5.4 on Centos 6.7 or Installing PHP 5.5 and MySQL 5.5 on a home server
AND
Installing the Apache web server
Like this.